For the last year or so, I’ve seen so many ube flan cakes online. I knew I wanted to try it at some point and decided I’d instead make a matcha cake version! I adapted the recipe from Sweet Ambition’s youtube video on ube flan cakes. Her recipe was for a 9 inch cake, so I divided it by 2 for a 6 inch cake.
1. Caramel:
- Preheat oven to 320F.
- Put sugar into a small saucepan and heat on high until sugar dissolves and a caramel forms. You can use one less pot and make the caramel diretly in the cake pan.
- If you make in a saucepan, pour into your cake and set aside.
2. Flan: [makes a little more than what’s needed for the 6 in cake layer]
I recently tried Sift & Simmmer’s Matcha Brochi recipe and wanted to try it again with a different flavor, using the things I learned from the first time. I had mentioned in my Instagram comments that I wanted to try passionfruit, so I went for it! Topped it off with different things. My favorite was the raspberry powder! Here’s the adapted recipe. It’s a brochi, I guess, but I’ll call it mochi here :p.
Started off trying to use a crepe maker that I borrowed from a friend. I thought it’d expidite the process. NOPE. At least not that particular one..it only caused me to waste batter since the griddle was too hot, so I switched over to a frying pan. My batter requires the temp to be around 250F, low heat. Overall, I was pretty pleased with it, but making this reminded me why I hate making them. lol. They take forever!
I wanted to make matcha madeleines with a filling, but hate having to make cavities in madeleines. After starting to make the batters, I realized that maybe I could pour the batter into a muffin pan. It totally worked and made making a cavity/ core much easier.
1. Matcha Madeleine Muffins: [12 total muffins]
- 113 g unsalted butter + some melted butter for coating pan
- 113 g sugar
- 120 g flour (sifted)
- pinch of salt
- 5 g baking powder
- 8 g matcha, could add more
- 2 large eggs (room temp)
- 15 g milk
- Preheat over to 375F.
- Melt butter in a small pan. Cool butter to room temp once it has melted.
- Add sugar, flour, baking powder, and matcha into a bowl. Whisk to combine.
- In a separate bowl, add eggs and milk and whisk until frothy throughout.
- Add the wet ingredients to dry ingredients and fold together.
- Add the cooled butter and fold some more until completely blended.
- An important step is now to cool the batter down in the fridge for at least an hour or if you’re in a hurry you can throw them in the freezer for 30 min.
- Use a pastry brush or something to spread the melted butter into the muffin pan. Be generous.
- To make filling the pans easy, I added my madeleine batter into a piping bag. Fill each mold with some batter.
- I put the pan on a scale and added in 40 g of batter. You can probably add up to 50 or 55 g and it’d be fine.
- Bake at 375F for 19 min.
- Take out and let cool for a few minutes and then remove from pans and let cool further.
2. Strawberry Mousse:
 UPDATE 2019 I now use 55 g almond flour, 50 g powdered sugar, 45 g egg whites, 45 g granulated sugar and bake for 25 min at 285F.
Update Jan 2020, lately I’ve been doing 305F for 20min. once again you just nead to learn your oven (going to leave this recipe at 285 though). See my notes in my General Macarons Recipe for the most up to date.
 This was my second attempt at tart making. The meringue I made was from an Andy Bowdy recipe, but since I scaled it down drastically, the sugar didn’t completely disolve and was weird. In the recipe below, I’ll correct for that.
The pâte sablée receipe is from The Kitchn. For the cream, I added some coconut cream to to see how it’d behave. Wasn’t too bad, but the butter taste was still prominent. The receipe has been through two iterations and is derived from a Kitchenlicious recipe (though it does a passionfruit cream–> instead of puree, I used cream and reduce butter).
NOTE: this recipe is only for about four - five 4.5 in tarts. Alternatively, you can make a single, larger 8-9in tart.
I recently saw some adorable little chiffon cake pans and bought a few. I knew the center would be the perfect vessle for a type of filling. Decided on a mousse. For this particular one, I set it a bit too much for my liking, but was still really happy with the flavor. The mousse is super liquidy when you first prepare it. But after a short while in the fridge/ freezer, it firms up nicely. It becomes a great texture after being in the fridge overnight. But yeah, this mousse was great and I’ll definitely use this recipe again. The mousse recipe was from The Spruce and the chiffon cake was adapated from Just One Cookbook.
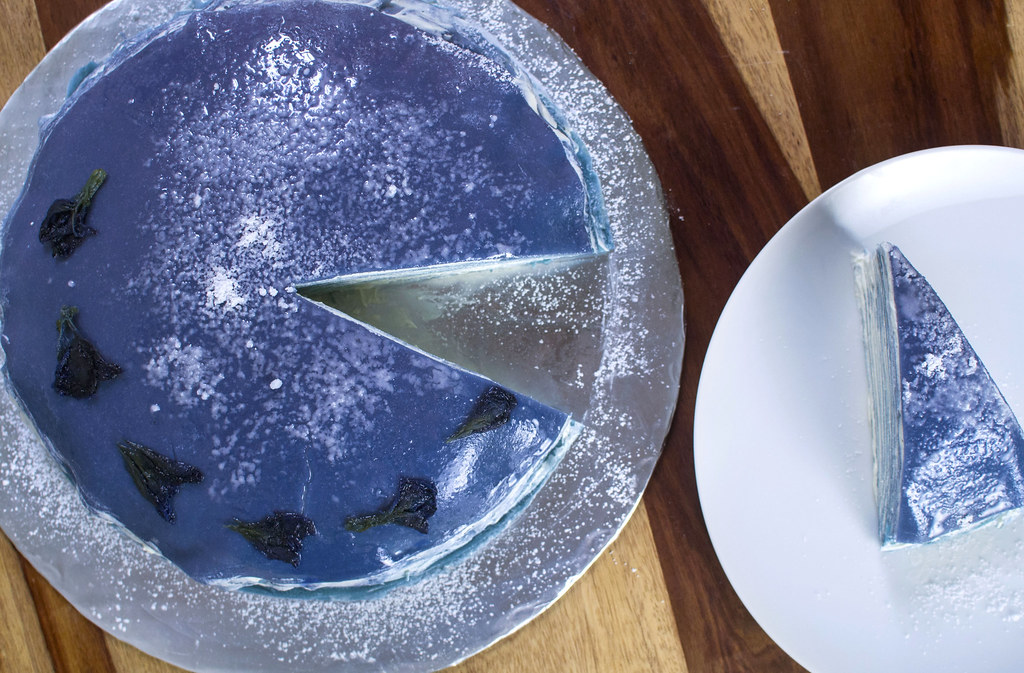
Butterfly pea flowers fascinate me. The tea is pH sensitive and produces an awesome blue to pink gradient. I’ve been thinking of how to apply to a dessert and decided to try a mille crepe cake. I’ve made a few different crepe cakes, but despite this, it always takes a gazillion years. Definitely worth at least one try though :D. This recipe should provide enough batter and diplomat cream for up to ~25-30 crepe layers.
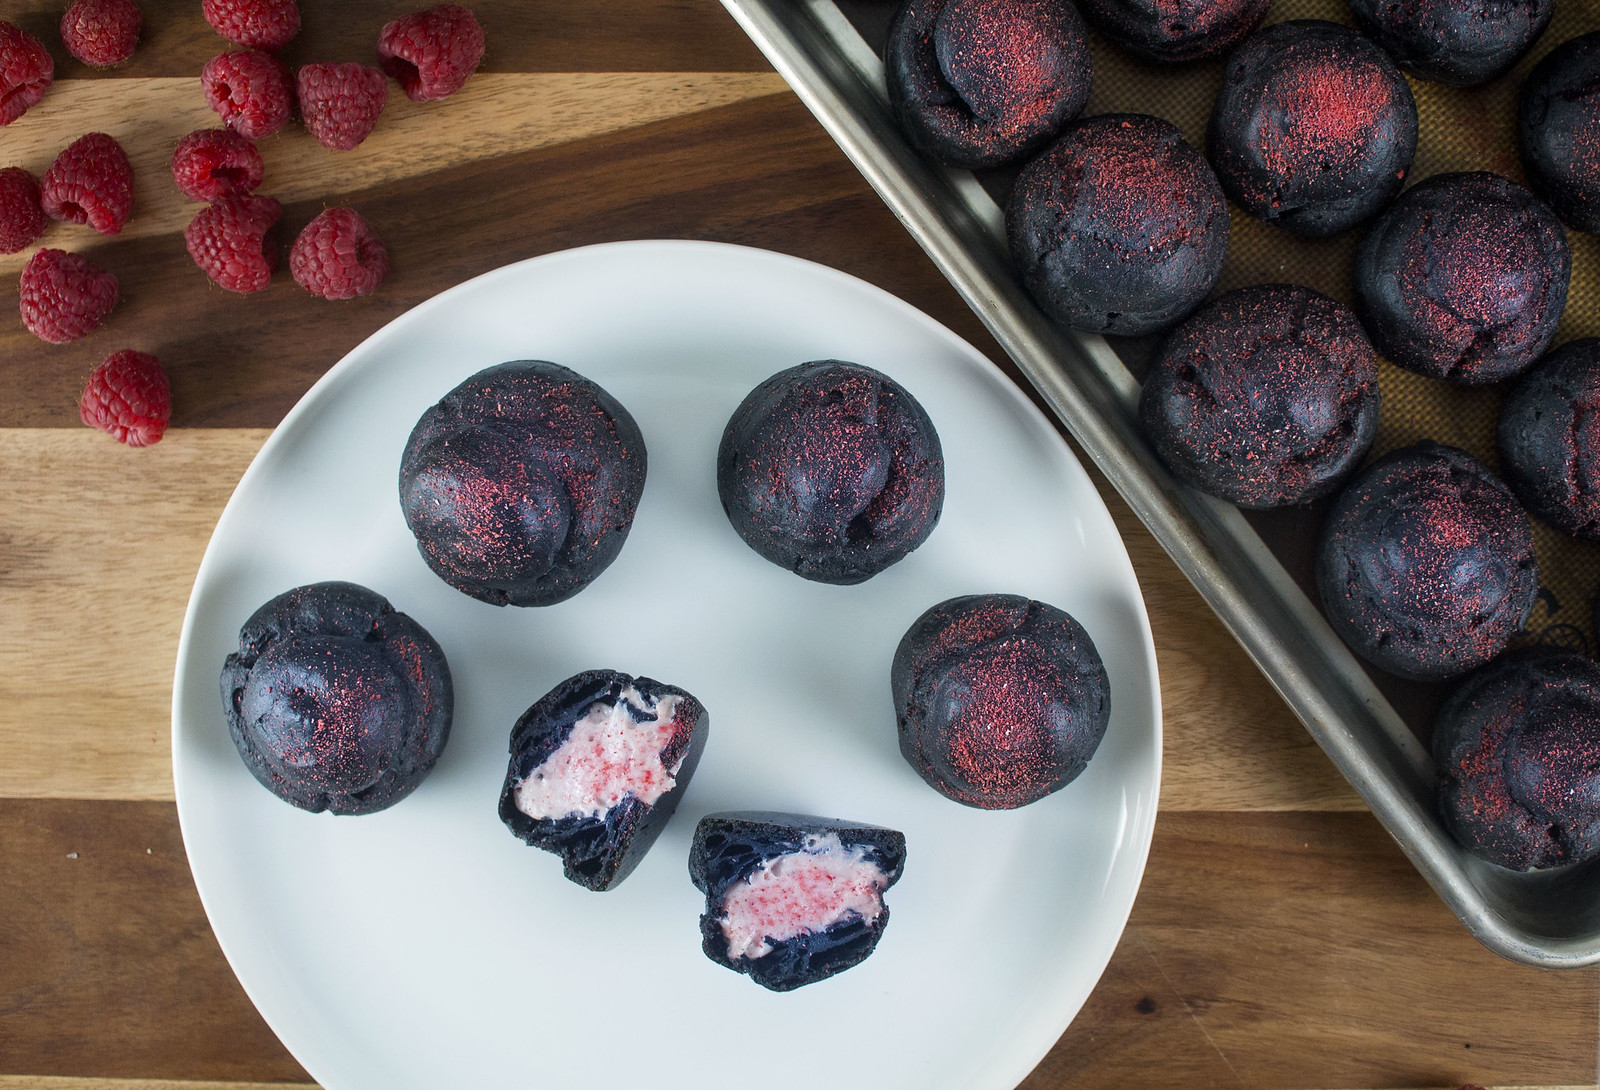
Lol. Continuing on with that activated charcoal trend :p. It makes all the colors pop! Charcoal makes batters more runny, so you might even want to use less. And it also drastically changes baking time for at least this recipe.
1. Charcoal Choux Pastry: [for about 25-30 cream puffs]
- 200 g water
- 125 g milk
- 112 g butter (stick, cut into small pieces)
- 4 g salt
- 4 g sugar
- 150 g flour
- 12 g activated charcoal
- 3 large eggs
- Preheat oven to 400F.
- Add milk, water, butter, sugar, and salt into a saucepan and bring to boil. You want your butter to have melted prior to boiling, so make sure you cut up the stick of butter into small pieces.
- Sift out the flour and add the charcoal. I whisk this up to make a nice blended mixture
- Take the saucepan off the heat, and add in the sifted flour and charcoal. Stir in (wooden spoon is best) the flour until everything comes together into a ball.
- Return to heat and stir vigorously until you start to see some dried residue on the side (3-4 minutes minutes). Sometimes if I’m not sure, I just stir for longer. In my experience, having less liquid in that dough is better.
- Transfer the dough into a bowl and beat until steam no longer rises. If it’s in a stand mixer, until the bowl is no longer hot to the touch. You don’t want to scramble your eggs that you’re about to incorporate.
- One at a time, beat in the eggs. Be patient and don’t add them all at once.
- Dough/ batter should now be a bit droopy. Add to a piping bag with a large round tip.
- Pipe you desired size onto a silpat or parchment paper (though, silpats are awesome and everyone should use them).
- Grab a small bowl of water and using your finger dipped in water, flatten all the points which resulted from piping them. Those little points will burn in the oven, so flatten those and any other pointy edges which may be on your silpat.
- Charcoal really changed up the baking parameters. They take much longer and you can’t see if it’s browning or not, so you have to press lightly to see if they’re solid yet. Bake for 35 minutes at 400F. Then drop the temperature down to 300F and bake for 20 more minutes.
- Opening the oven during the first 30 minutes will cause them to collapse on themselves. You want the puffs to form a solid structure.
- Now open the oven and without pulling out the pan, press lightly on the puffs to see if they’re solid. If they are, you want to stab holes in the bottom. I have a long pointy piping tip that I now use, but I used to use a chopstick and that worked perfectly fine. 1. Go through and poke holes in the solid cream puffs and then put them back onto the pan on their side. Removing the pan from the oven will cause the ones that aren’t fully set yet to collapse, so make sure to leave it in.
- If all the puffs have been stabbed, then you can bake for maybe 15 more minutes at 250F. You can turn off oven and leave them in to dry out even more.
- If the cream puffs aren’t fully baked yet, drop the temperature down to 250F and bake for another 15 minutes. After that, check back every 10 minutes to see. Once they are all stabbed, turn off oven and leave the pan inside for the puffs to dry out.
- Once the insides have dried (you can check a tester), take the pan out and let fully cool.
2. Raspberry Diplomat Cream: (Not 100% sure this is what it’s called)