
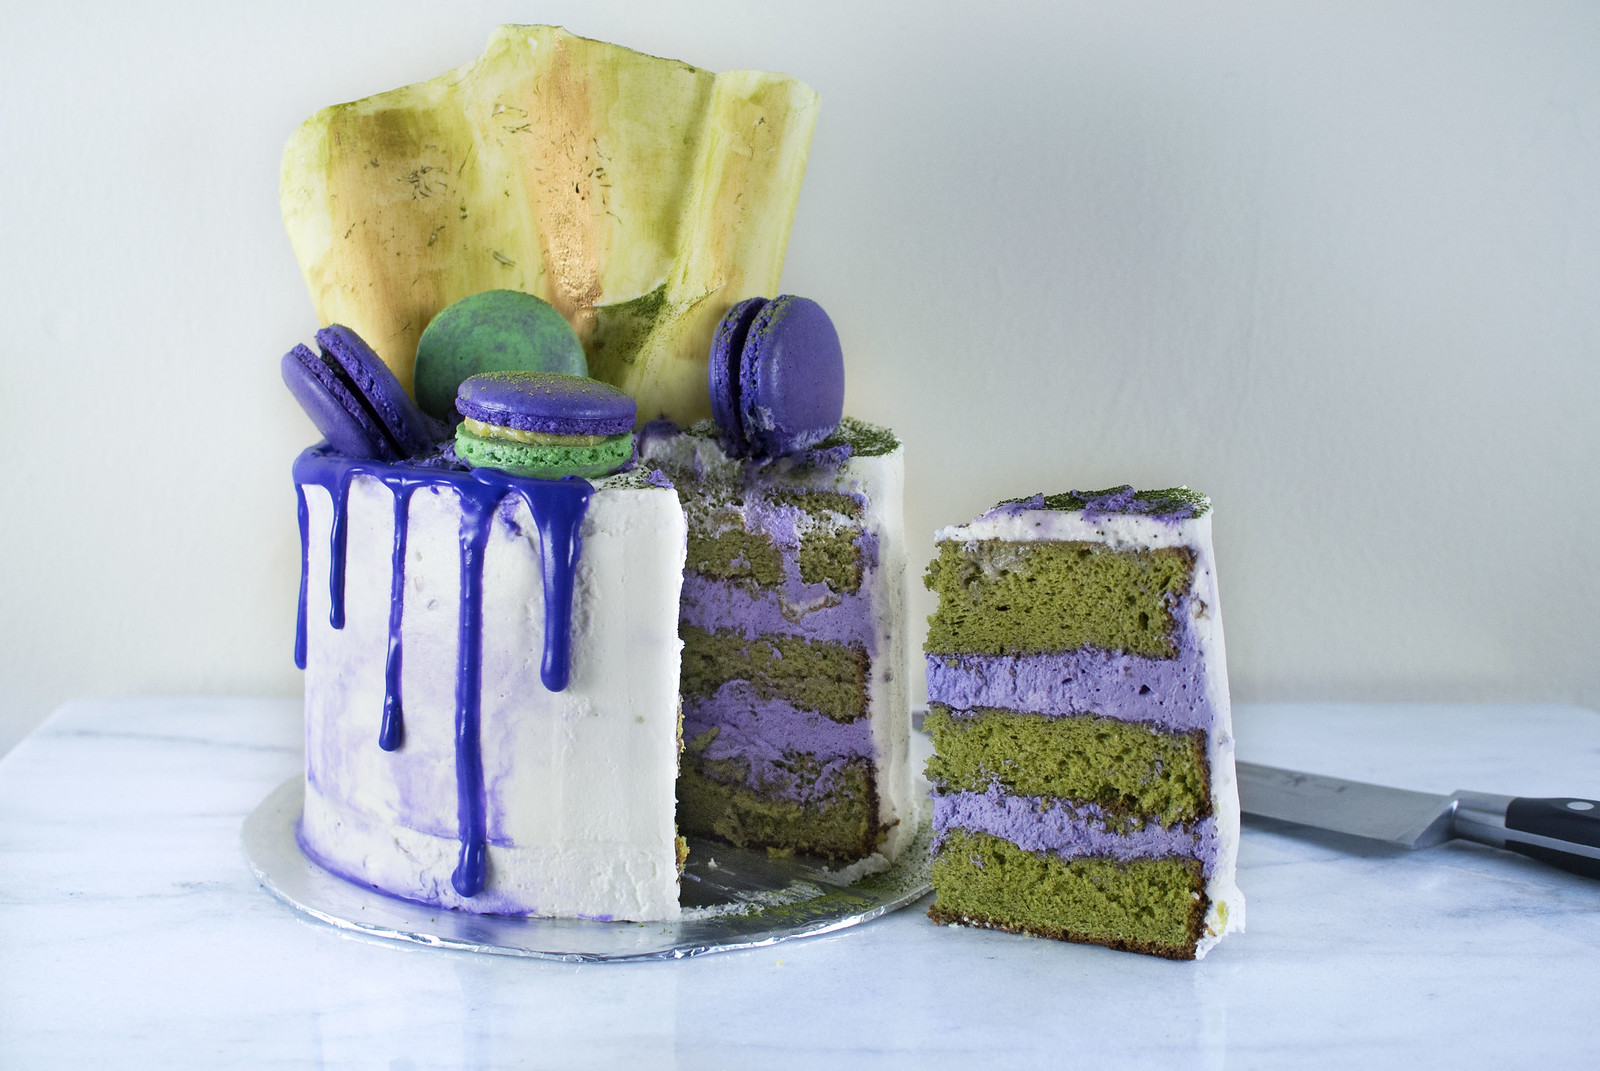
Matcha and ube are life, so combining them only seemed natural :D. This cake had 6 components. The actual cake, whipped cream frosting/filling, macarons (shells + lazy custard/ ganache filling), white chocolate drip, and the sail.
1. Sponge [makes three 200g 6-inch cake layers]
- 112g cake flour
- 1 tsp baking powder
- 1/4 tsp salt
- 5 large eggs, separated
- 156 g granulated sugar
- 8 g matcha powder
- 60 g whole milk
- Oven at 400F. Line baking pan with parchment paper on bottom and grease the sides of the pan if you don’t have nonstick.
- Whisk together sifted flour, matcha, baking powder, and salt.
- In a different, large bowl, whisk egg yolks, sugar, and milk until pale.
- Separately, whisk egg whites until medium stiff peaks.
- Add dry mixture to wet mixture and fold together. Then slowly fold in the medium stiff egg whites. I usually add 1/3 of the meringue first to make the batter light, then fold in the remaining egg whites.
- Pour batter onto the baking sheet and then rap the sheet down a few times to release any big air bubbles.
- Bake for 25 minutes (maybe a bit less) ([a toothpick should go in and out cleanly].
- Bang the cake down and then flip over onto somewhere to cool. The cake should have receded from the edges so it should plop right out. Remove parchment paper and then once it cools enough to hold it’s own, wrap in plastic wrap and fast cool in the fridge.
2. (Ube) Stabilized Whipped Cream Frosting:
- 570 g heavy whipping cream
- 25 g powdered sugar (might need more)
- 3 g ube extract
- 50 g clear piping gel (see below for recipe if you don’t have any)
- 60 g water
- 30 g cornstarch
- 150 g light corn syrup
- Whenever whipping your own cream, make sure the first thing you do is throw your bowl and whisk attachment into the fridge or freezer. Cold is your best friend.
- If you don’t have clear piping gel, make some. There are other ways to stabilize a whipped cream, but I just discovered this and I really like it. Add water and cornstarch and whisk until there are no lumps. Then add and whisk in the corn syrup.
- Heat over medium, stirring every so often. It should bubble and turn into a hair gel consistency. Cool to room temperature.
- Take out chilled bowl and whisk the powdered sugar and cream together until soft peaks.
- Whisking at a fast speed, add in 50 g of the clear piping gel (whisk it up a bit before adding it in).
- Whisk until stiff peaks and is well incorporated.
- Put 250 g of the stabilized whipped cream into a different bowl and fold in the ube extract.
3.1. Macaron Shells: For about 10 1.5 inch macarons:
- 46 g almond flour (sift, no big almond pieces)
- 43 g powdered sugar
- 35 g egg whites (room temp)
- 25 g granulated sugar
- Oven to 325F. Measure out and sift your powdered sugar and almond flour. Whisk together and set aside.
- Make your meringue. I speed warm up my egg whites by putting them in a small container and then putting that container in a bowl with hot water. Takes about 5 min to bring up the temp and doesn’t cook them.
Beat/ whisk your egg whites until frothy and start to incorporate the granulated sugar a bit a time. Beat until stiff peaks. - Macaronage. Look up on Youtube if you’re unfamiliar on how to do so.
- Fold about half your dry ingredients into the meringue until just incorporated and then add the rest and continue folding until just incorporated.
- Now would be the time to add food coloring. Gel or powder, not liquid. In this case, I split the batter into two and added green food coloring to one and purple to the other.
- Fold until you get a lava like consistency. Fold by scraping along the edge of the bowl to deflate the meringue a bit and then scooping the batter. Repeat. You should be able to pick up the spatula and have the batter fall down in a ribbon. The ribbon should incorporate back into the main blob after about 10ish seconds. If it doesn’t fall correctly, I do a few more folds. Put into a piping bag with a tip.
- Pipe out your macarons. I use a silpat (would highly recommend). Rap the baking sheet against the table a few times. Pop any air bubbles with a toothpick and swirl the toothpick around a bit to have that hole close up.
- I hate waiting for the shells to dry, so I cheat and dry the shells using the oven heat. I do this by opening the oven and holding the tray in the oven, rotating it every 10 seconds or so for about a minute. My hands usually get hot at that point. I take them out for about a minute. Then back in again, rotating, for another 30 seconds. This quickly dries out the shells and makes a skin without having to wait 30 minutes at room temp (especially if it’s humid!) :p.
You want to be able to touch the shell and have it not be sticky. Make sure it doesn’t shine and you’re probably good to go. - Bake for 9 minutes at 315 and drop to 300 for another 9 minutes. (The macarons worked out well using these parameters, but all ovens are different, so you have to do a bit of your own troubleshooting >.<)
3.2. Lazy Custard/ish Ganache Filling: ube/ matcha
- 1 large egg yolk
- 9.25 g corn starch
- 85 g milk
- 25 g sugar
- ~1ish gram of either ube extact or matcha powder
- 25 g white chocolate
- Combine egg yolks and cornstarch until fully incorporated.
- In a saucepan, high heat, combine milk and sugar. If you’re just doing one flavor for the custard, incorporate it now.
- Bring to boil and remove from heat.
- While whisking constantly, slowly add to bowl with yolks and cornstarch. You are tempering the egg yolks so that they won’t scramble.
- Return the mixture to the saucepan on high heat.
- Bring to rolling boil, while whisking/ mixing constantly. The mixture will become custard like. Normally I don’t like my custards to be in the pan for super long, but I wanted to get lots of liquid out so I kept it on the heat until it was very thick.
- To get rid of lumps in your custard you can either sieve it through a fine mesh or use a hand blender (works like magic!). Or you might not have any lumps to begin with and then you’re all set.
- Add the white chocolate to the warm custard and stir in.
- Divide custard into two parts and then stir in respective flavoring.
- Add custard/ ganache into a piping bag with a small tip.
4. Ube White Chocolate Drip:
- 50 g white chocolate
- 30 g heavy cream
- a few grams of ube extract
- Start to melt the white chocolate over a double boiler.
- In a small pot, add the cream and the ube extract and stir until it begins to simmer. Once it does, add to the bowl with white chocolate.
- Stir until melted and then cool. Add to a piping bag with a tip around the size of the drips your want.
- I initially tried a different recipe using 1:1 of chocolate: cream but that was too runny and had to go back and melt in more white chocolate.
5. White Chocolate Sail:
- 100 g white chocolate
- So this is only white chocolate. Start to melt on a double boiler and take off when most of the white chocolate is melted.
- Stir until fully melted and let cool slightly.
- Pour onto a piece of parchment paper and spread with a spatula, relatively evenly and not too thin.
- With the edges of the parchment paper, form ‘waves’. Online people use clips to maintain these shapes. I didn’t have any so I just held it until it set, which didn’t take too long.
- As soon as it sets enough to hold its own, place into the fridge to fully harden.
Assembly:
- I just bought a spinny table thing. I used that and it was super helpful.
- Even up your cake layers if you want with a cake leveler of a bread knife.
- Place your first layer down onto a cake board or plate and add some ube whipped cream on top.
- Repeat until you don’t have any cake layers left. Press down a bit and even out the sides a bit. I briefly cooled it in the fridge.
- Add globs of the non ube whipped cream now, careful not to mix it with the ube whipped cream filling and spread it around. This is where the spinny table really came in handy.
- To even out the whipped cream after I had it mostly even, I used a metal cake scaper that I briefly heated with a blow torch. It smooths out the whipped cream very nicely.
- Once the whipped cream is done, put in the fridge or freezer.
- Assemble macarons by piping the fillings in.
- Carefully remove the parchment paper from the bottom of the sail and then paint it with food coloring/vodka dilution of your choice. I tried using matcha powder. Meh. Gold dust always works though.
- Take out the cooled cake and add the drips. It doesn’t matter too much how you do it, just try to vary the amount you squeeze out a location.
- Finally add the sail and macarons. I also added some piped out ube whipped cream and matcha powder.
Additional Notes:
- Assemble and frost your cake before making the drip. Otherwise the drip will harden before you have time to use it.
- Taste the whipped cream early. I didn’t add enough powdered sugar and majorly regretted it.
- Cakes are dumb and take long. Start earlier than 9pm on a week day lol.
Enjoy! -Mario
Twitter
Facebook
Reddit
Email